Table of Contents
ToggleHow to Fix Kitchen Sink Leakage: Step-by-Step Solutions
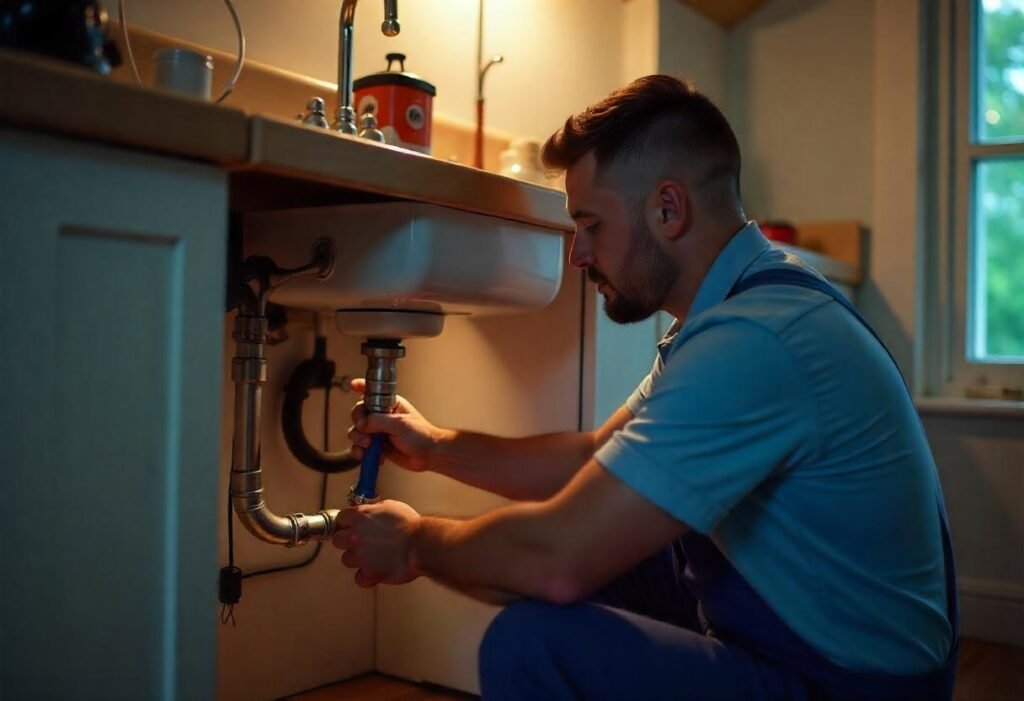
A kitchen sink leaking might cause water wastage and this could lead to damage of the cabinets or flooring. Dripping sounds or some unexpected puddles under the sink can be really annoying. Fix kitchen sink leakage, which might seem a daunting task at first, but with all the right tools and steps, it is totally manageable.
This read assists in recognizing potential problems, like pipe loosing or worn out washers and faulty sealants. It also includes clear instructions on how to fix kitchen leakage. Keep your kitchen running well by addressing the problem promptly and efficiently. Let’s get started.
Before starting any repair, take a close look to find out where the water is coming from. The leak can occur from the tap, spray hose, or underlink pipe. Use a flashlight to observe the tap base, spray hose, and cabinet floors such as hard-to-looking areas.
See puddle or moist spots that can give you a clue. Take your time – Except for the exact source, now you will save efforts later. Once you become leaks, stop the water supply to prevent any disturbances during repair.
Fix a Leaky Faucet
A damaged O-ring or washer is the main causes for a leaky faucet. First, turn off the water supply and dry the faucet. Then, use a wrench to fix it, loosen the faucet coupling nut and remove the faucet. Tighten the O-ring stem screw or replace the O-ring altogether. Turn the water supply back on and inspect for any signs of leakage. If water still escapes, clean or replace the valve seat, which connects the faucet to the spout. Protect your faucet’s finish by wrapping duct tape around your wrench. These small fixes can effectively stop annoying faucet leaks and prevent water waste.
Replace a Faulty Spray Hose
If water is dripping from your sink’s spray hose, disconnect the spray head from the slide nut using a small screwdriver. Inspect the washer, as this is often the cause of the leak. Replace the washer if needed. If the spray head is broken, remove the C-clip and replace it with a new one. If the hose is leaking, replace it entirely. Put the new hose in place, tighten it by hand to the faucet stem, and secure it with a wrench. Always check the connections for tightness to prevent further issues.
Repair Leaks Around the Sink Strainer
Leaks around the sink strainer occur when the seal between the strainer and sink fails. Begin by tightening the connection between the strainer and its basket. If this doesn’t work, remove the strainer and clean off old plumber’s putty. Apply fresh putty evenly before reinstalling the strainer. If the leak persists, replace the entire strainer assembly with a new one. For minor leaks, you can seal the area using silicone. This solution is quick, but replacing parts is often a more lasting fix.
Address Leaks in Hot and Cold Supply Lines
If you see water collecting underneath your sink, the first thing you must do is to check the hot and then the cold supply water line. Check the spot where the supply meets the water shut-off valves and tighten the nuts well. Old supply lines, typically over five years old, may require a complete replacement. Before beginning with any repairs, ensure that the main water shut-off is completely turned off. Once tightened or replaced, turn the water back on slowly and watch for leaks. This proactive approach helps avoid future plumbing problems.
You may also like-Easy & Unique Ways to Eliminate Garbage Disposal Odors
Tighten a Loose Drain Seal
A loose or damaged drain seal can cause leaks under the sink. Wondering how to fix kitchen leakage? Just remove the old drain seal using pliers and clean the area thoroughly. Apply a new adhesive to ensure a secure fit, then install a fresh drain seal. Tighten it properly to create a watertight barrier. Test by filling the sink with water and observing if any leaks occur. If the seal still doesn’t hold, consult a plumber for further inspection.
Repair Corroded Valve Seats
Valve seats link the faucet to the spout and may corrode over time, causing leaks. Shut off the water supply and take the faucet apart to reach the valve seat. Scrub the area with a brush or replace the valve seat if it’s heavily corroded. Apply plumber’s grease to prevent further wear. Once the repair is complete reassemble the faucet and turn on the water to check for leaks. Routine upkeep usually extends the life of valves.
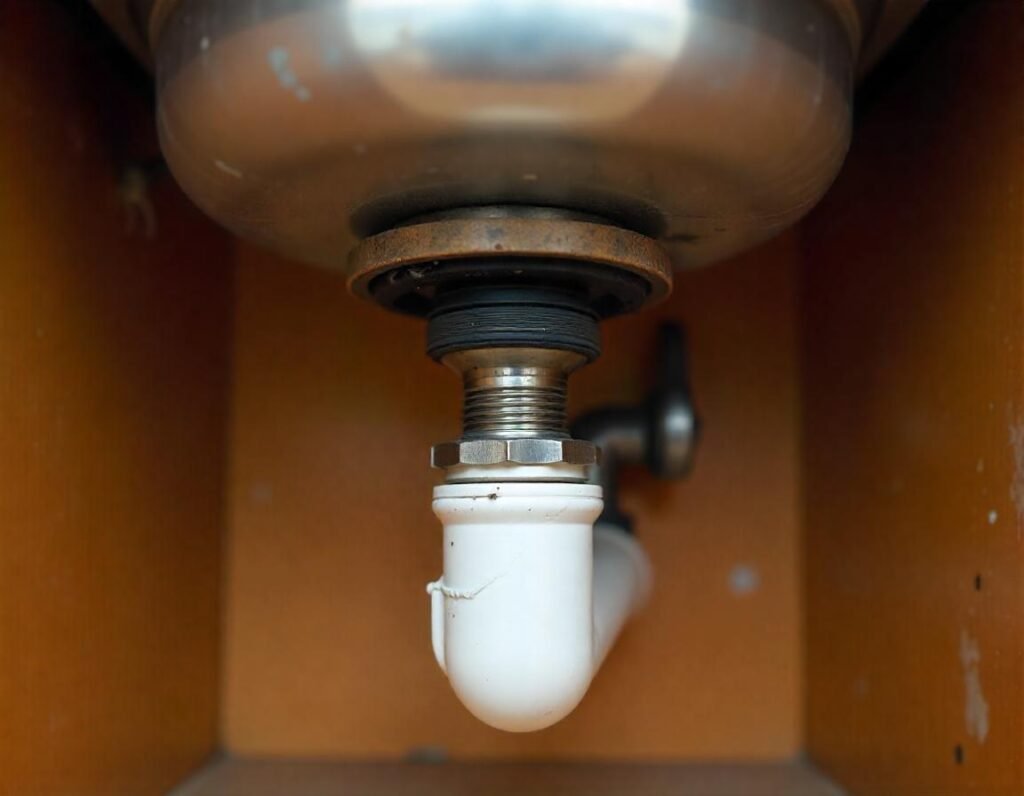
Replace Worn Pipe Gaskets
Worn-out gaskets or damaged insulation sips are the major causes for leakages. For repair, loosen the slip joints of the pipes and take off the old gasket. Replace them with new, rubberized ones for a better seal. Tighten the slip nuts securely to avoid further leaks. For extra protection, apply silicone tape or epoxy putty around the joints. Always test the pipes by running water through the sink before considering the job complete.
Call a Professional for Persistent Leaks
If your DIY repairs don’t fix the issue or the leak continues, it is good to contact a professional plumber. Experts know how to fix kitchen leakage quickly. They identify and fix stubborn leaks, saving your time and frustration. Also, they will ensure that your plumbing system is in safe and sound working condition with proper plumbing maintenance, preventing any issues in the future. If fixing your kitchen sink feels too difficult, you can always ask for help.
Summing Up
Fixing a kitchen sink leak quickly is essential to prevent water damage and unnecessary wastage. Routine checks and opting for reliable, high-quality components like durable faucets and strainers can significantly reduce the risk of future leaks. Ensuring proper installation and consistent maintenance helps keep your kitchen sink in top condition, allowing it to function efficiently and remain leak-free for years to come.
With expert tips from Yellow Brics, you’re always one step ahead in home care.
Questions ? Look here.
What are the common causes of kitchen sink leaks?
Leaks at a kitchen sink often stem from worn-out washers or O-rings, loose plumbing connections, corroded pipes, cracked sink components, or improper sealing of parts like the drain flange.
How do I identify where the leak is coming from under my sink?
Turn off the water supply, dry the area, then run water and observe carefully. Common leak points include the P-trap joints, supply line connections, the faucet base, and the drain flange. Using a flashlight helps detect drips or moisture trails.
Can I fix a sink leak myself or should I call a plumber?
Many leaks (loose connections, replaced washers, re-sealing) are DIY-friendly if you have basic tools and patience. But if there is corrosion, cracked parts, complicated plumbing, or persistent leakage after your repair attempt, it’s safer to call a professional.
What materials or tools do I need to repair a kitchen sink leak?
Useful items include plumber’s tape (Teflon tape), silicone or plumber’s sealant, replacement washers or O-rings, wrench or adjustable pliers, bucket, rags, and possibly a new P-trap or parts if the existing ones are damaged.
How can I prevent future leaks at my kitchen sink?
Regular maintenance helps: periodically check and tighten connections, inspect washers/O-rings and replace when signs of wear appear, avoid overtightening, don’t pour grease or harsh chemicals down the drain, and clean drain traps to avoid buildup.